All about camera, it, laptop , mobile and Apps Technology Information
Tuesday 3 July 2018
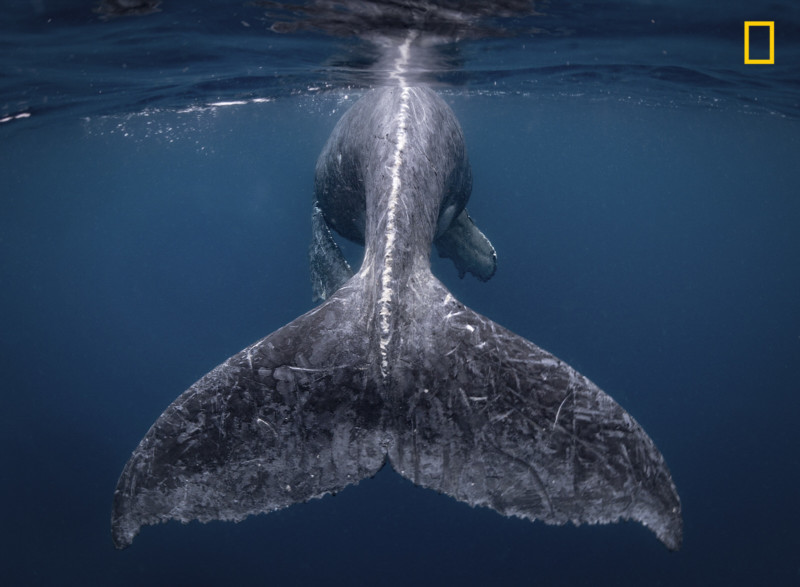
National Geographic has announced the winning photos of its popular Travel Photographer of the Year 2018 photo contest. The grand prize was awarded to Japanese photographer Reiko Takahashi, who captured an underwater photo of a humpback whale calf’s tail.
The winning photo, titled “Mermaid,” was selected from over 13,000 entries received this year. Here’s the description provided by the photographer:
I was fortunate to have encountered a humpback whale with her calf on my first day snorkeling near Japan’s Kumejima Island. Most of the time, the calf stayed close to her mom. At one point, the calf began jumping and tapping its tail on the water near us—it was very friendly and curious. Finally, the mother, who was watching nearby, came to pick up the calf and swim away. I fell in love completely with the calf and it’s very energetic, large, and beautiful tail.
Takahashi is a long-time photographer who left her office job to pursue underwater photography, and she traveled to Japan’s Kumejima Island specifically to capture photos of humpback whales with their young calves.
“It was a special scene for me, to be able to take a photo of the calf, completely relaxed in gentle waters,” Takahashi tells Nat Geo. “I really cannot believe it. It was my dream to win. I am honored and it will be the driving force for my future shooting.”
As part of her win, Takahashi receives a $10,000 award.
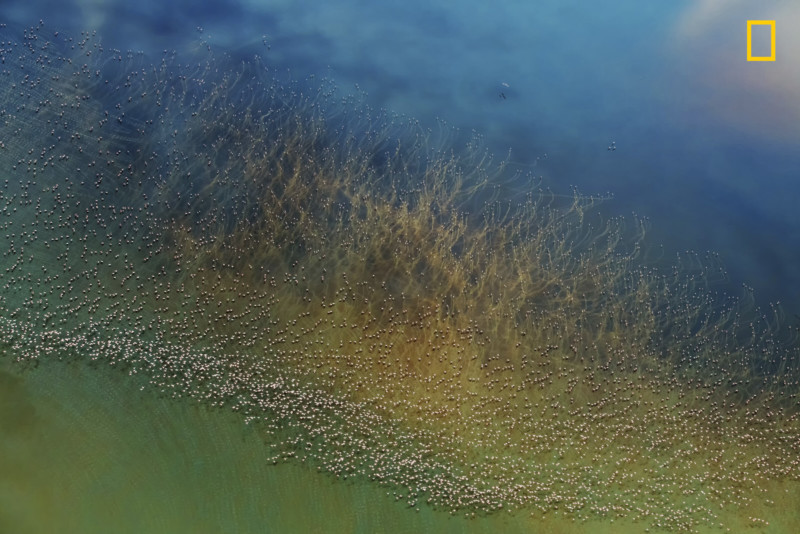
Nature, 2nd Place
FLAMINGOS TAKING OFF by hao j./National Geographic Travel Photographer of the Year Contest. “Thousands of flamingos are seen taking off from the colorfulLakeNatron in Tanzania. Before taking off, flamingos need to take a short run on water to build up some speed. At that moment, their long, red legs create a series of water ripples on the surface of the lake. Looking down from the helicopter, these ripple lines look like giant aquatic plants flowing in the water. This photo was taken from a helicopter.”
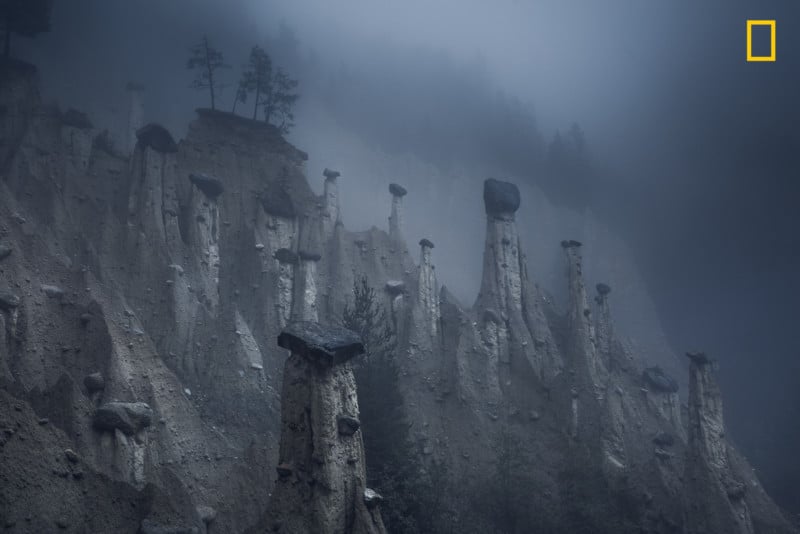
Nature, 3rd Place
MARS by Marco Grassi/National Geographic Travel Photographer of the Year Contest.. “These natural sand towers, capped with large stones, are known as the Earth Pyramids of Platten. They are situated in Northern Italy’s South Tyrol region. Formed centuries ago after several storms and landslides, these land formations look like a landscape from outer space and continuously change over the years and, more accurately, over seasons. This natural phenomenon is the result of a continuous alternation between periods of torrential rain and drought, which have caused the erosion of the terrain and the formation of these pinnacles. As the seasons change, the temperatures move between extremes and storms affect the area, pyramids disappear over time, while new pinnacles form as well.”
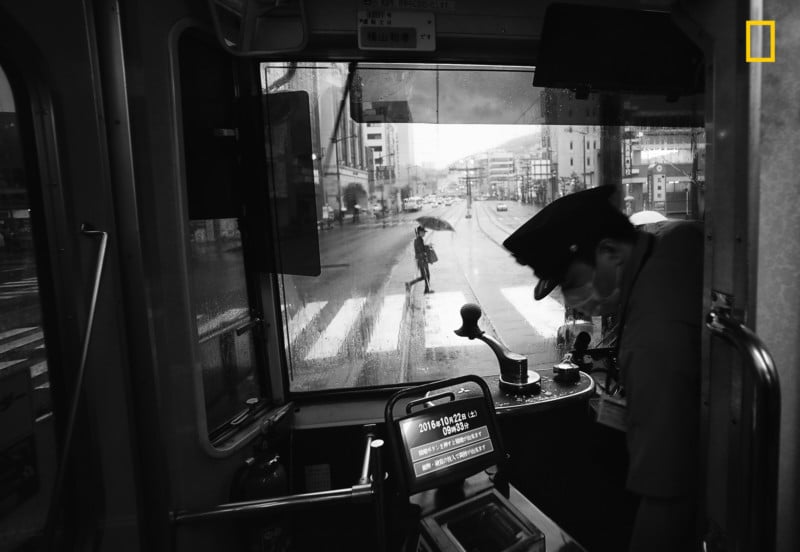
Cities, 1st Place
ANOTHER RAINY DAY IN NAGASAKI, KYUSHU by Hiro Kurashina/National Geographic Travel Photographer of the Year Contest.. “This is a view of the main street from a tram in Nagasaki on a rainy day. The tram is vintage but retrofitted with modern ticketing equipment. A conductor is no longer on board—only the lone driver. The quiet streetscape seen through the front windshield of the tram somehow caught my attention. This view presents quite a contrast to busy urban centers in Japan, such as Tokyo and Osaka. The ride on a vintage tram through the relatively quiet main street was a memorable experience during our week-long visit to the historic city of Nagasaki.”
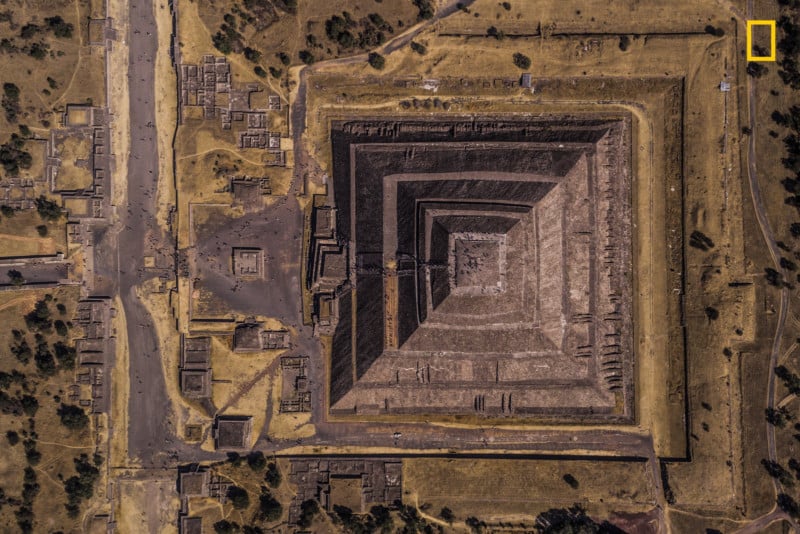
Cities, 2nd Place
GEOMETRY OF THE SUN by Enrico Pescantini/National Geographic Travel Photographer of the Year Contest.. “Teotihuacanmeans ‘the place where the gods were created,’ and that’s the exact feeling visitors have when they walk along the Avenue of the Dead at this Mexican archaeological site. This pyramid was dedicated to the god of Sun, and I found it mesmerizing how the rising sun in the picture conquered just half the image, while the other half is in the shadows. I have always loved archaeology and ancient civilizations, so I couldn’t wait to visit Mexico and explore the remains of the pre-Columbian civilization. I planned my visit to Teotihuacan at sunrise, to get a combination of golden sunlight, play of shadows, and few crowds around. I flew my drone to see if the image I had in my mind was really out there: luckily for me, this frame was just waiting for my camera!”
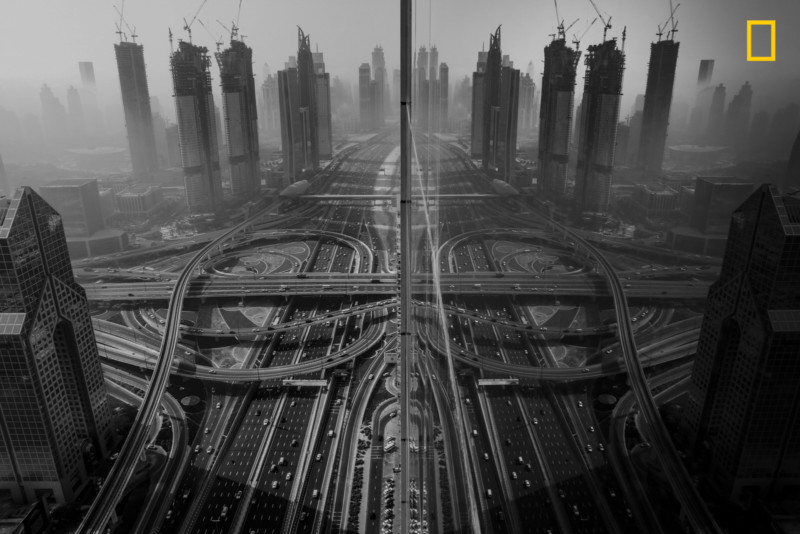
Cities, 3rd Place
REFLECTION by Gaanesh Prasad/National Geographic Travel Photographer of the Year Contest.. “On an early morning, I wanted to photograph the fog, which is epic in Dubai every year from December to January—and almost every photographer’s dream in this part of the world. Sadly, I could not get access to the rooftop and so I peeped through the glazed window on a lower floor. I was overwhelmed and excited to see how beautiful the city looks, and my excitement was quadrupled as soon as I saw the reflection of the road and building on the building that I was in. I immediately opened the window to the maximum permissible amount and clicked a single shot with stretched hands.”
People, 1st Place
TEA CULTURE by Alessandra Meniconzi/National Geographic Travel Photographer of the Year Contest.. “For a long time, I have been fascinated by the ancient Mongolian method of hunting with Golden Eagles. In early 2018, I followed one family of eagle hunters during their migration from winter camp to spring camp. Mongolia is sparsely populated, but the inhabitants have a very hospitable and welcoming culture. Tea for Kazakh culture is one of the attributes of hospitality. Tea isn’t just a drink, but a mix of tradition, culture, relaxation, ceremony, and pleasure. Damel, seen here wrapped in heavy fur clothes, drinks a cup of tea to keep warm from the chilly temperatures in Western Mongolia.”
People, 2nd Place
LEIDA AND LAELLE -I WILL LIFT YOU UP by Tati Itat/National Geographic Travel Photographer of the Year Contest.. “Since 2016, I’ve been involved with Haitian immigrants and refugees living in my city, Estrela. I have become friends with some families, and especially with twin sisters, Leïda and Laëlle. They say living in Brazil is like living in paradise—very different from the reality of their country of origin. They dream of becoming models and teachers, as a way to earn money to bring their other relatives from Haiti to Brazil, to live all near one another. On this day, they were playing in front of their home, improvising exercises to develop their imagination and creativity, as if they were actresses, and playing an imitation game with poses. Laëlle reached for Leida’s face and lifted her head up, showing her where she should look. At this brief moment, I took the photo.”
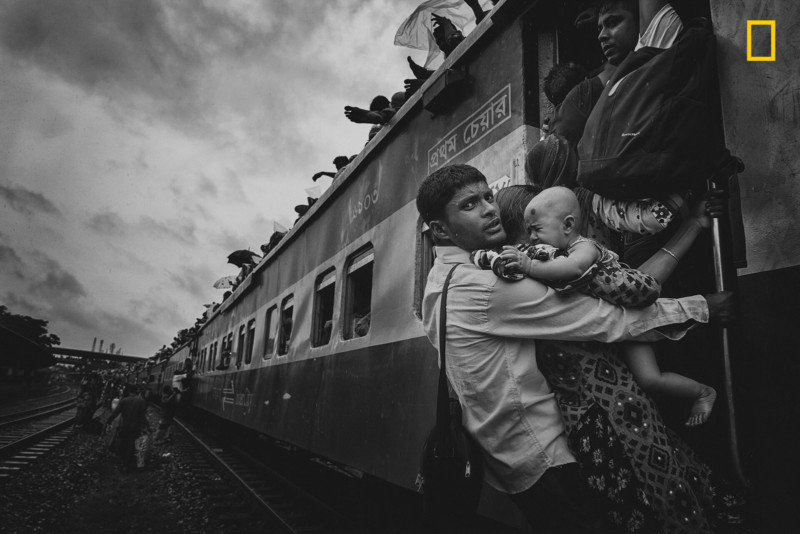
People, 3rd Place
CHALLENGING JOURNEY by MD Tanveer Hassan Rohan/National Geographic Travel Photographer of the Year Contest.. “This photograph was taken from Dhaka’s airport rail station during the Eid vacation. People were returning to their village homes to spend Eid with families, and the rush at the last hour was immense. One man caught my attention: he was dangling on a train’s handle with his family, trying to get inside the train. At that time, rain started and the train began to slowly move. The family had tickets to board the train, but couldn’t get to their seats. There are many people like him, who come to Dhaka for work—leaving their families and home villages—so when they get vacation, they don’t want to miss the opportunity to spend time with dear ones, no matter what.”
Original Post from : https://petapixel.com/2018/06/28/the-winning-photos-of-nat-geo-travel-photographer-of-the-year-2018/
Sunday 24 June 2018
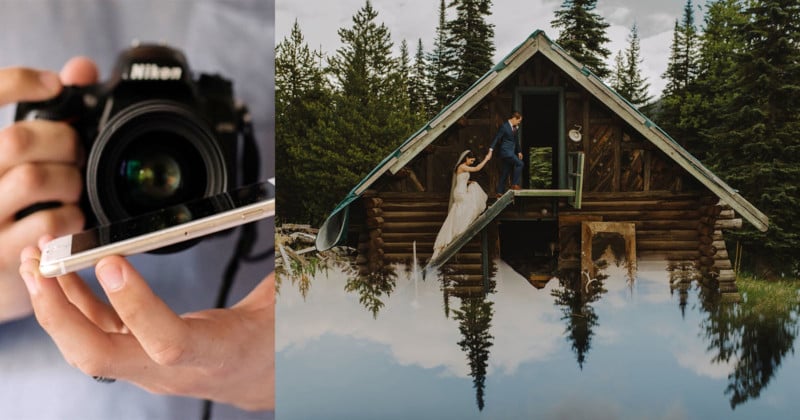
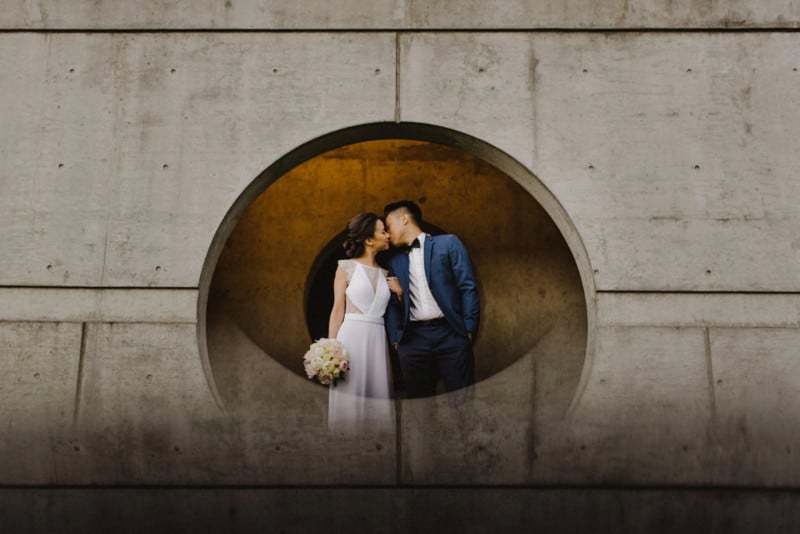
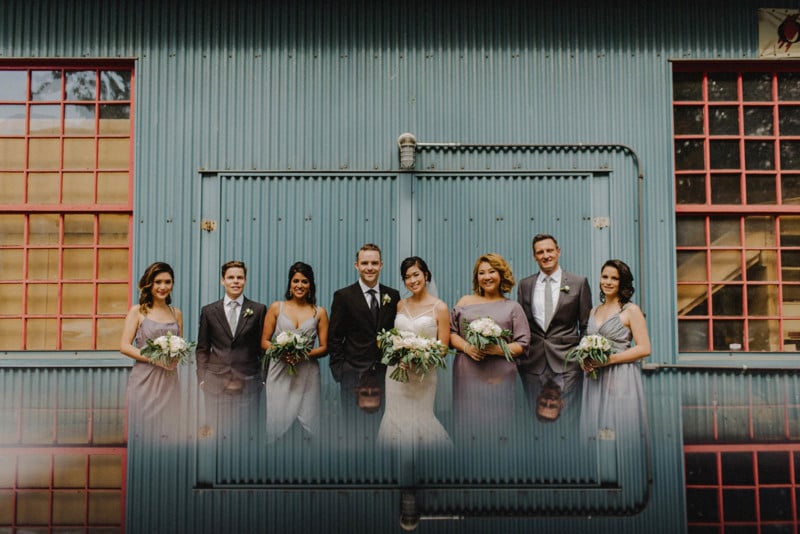
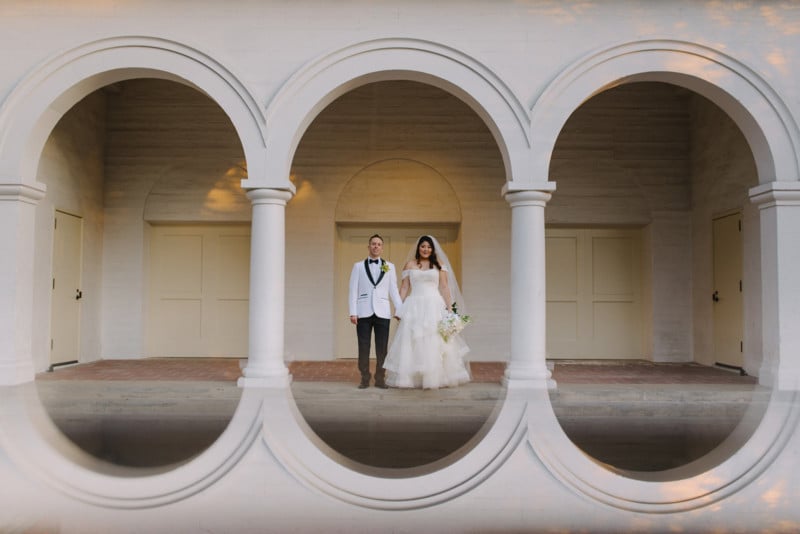
Wedding photographers are always looking to take creative, novel portraits and a quick, simple trick is often sitting right in their pocket. By using a phone screen as a reflective surface, it is possible to cover up unsightly elements, add intrigue, and make an image that much more interesting.
Here’s how it works:
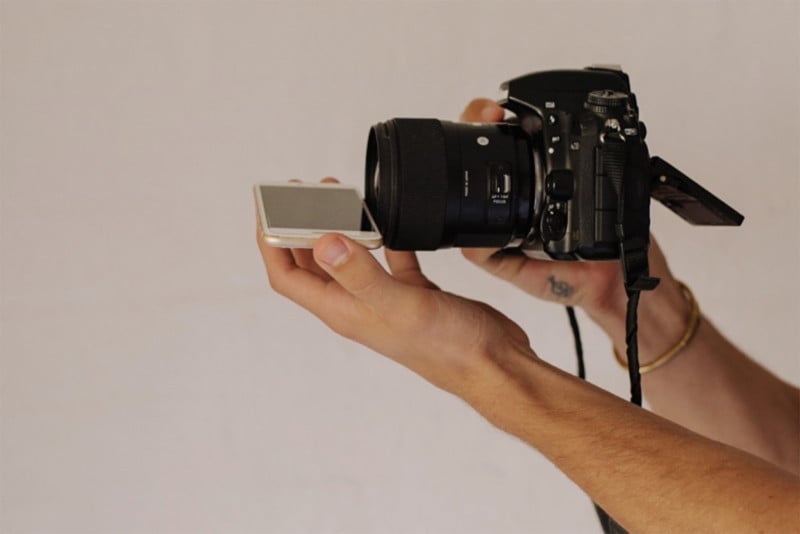
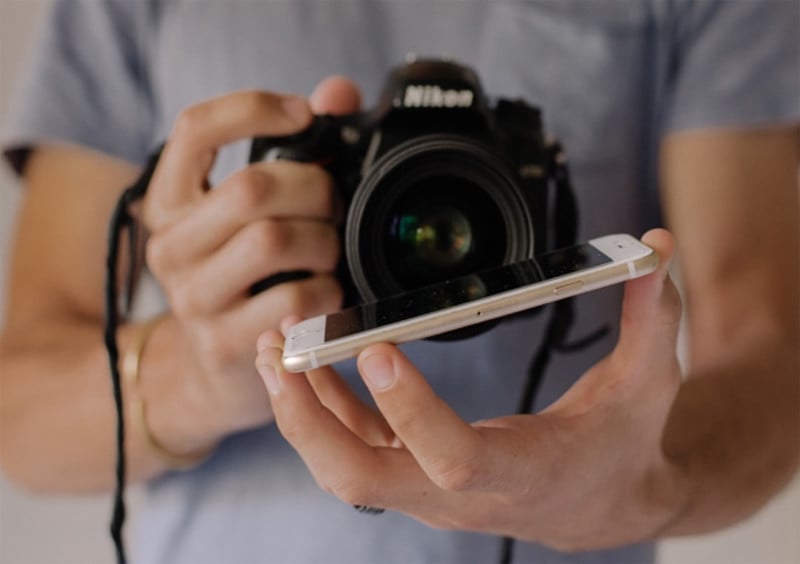
1. Start by holding your phone on a horizontal plane to the bottom edge of your lens.
2. As you look through the viewfinder you’ll see part of the scene reflecting onto the lower part of the image.
3. Simply adjust the phone slightly (while still holding it close the edge of the lens) until you see a reflection that you like.
BeforeAfter
4. Take the picture!
Here are some tips:
1. If you have a bulky case protecting your phone remove it to create a more seamless reflection.
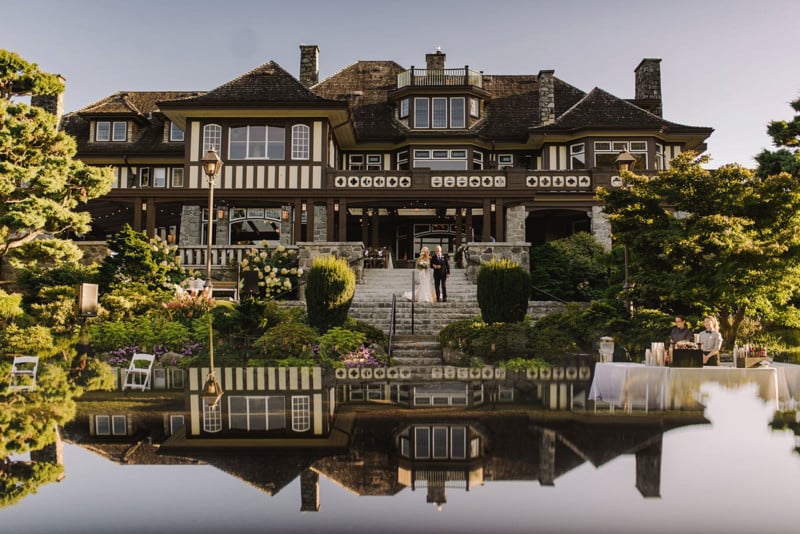
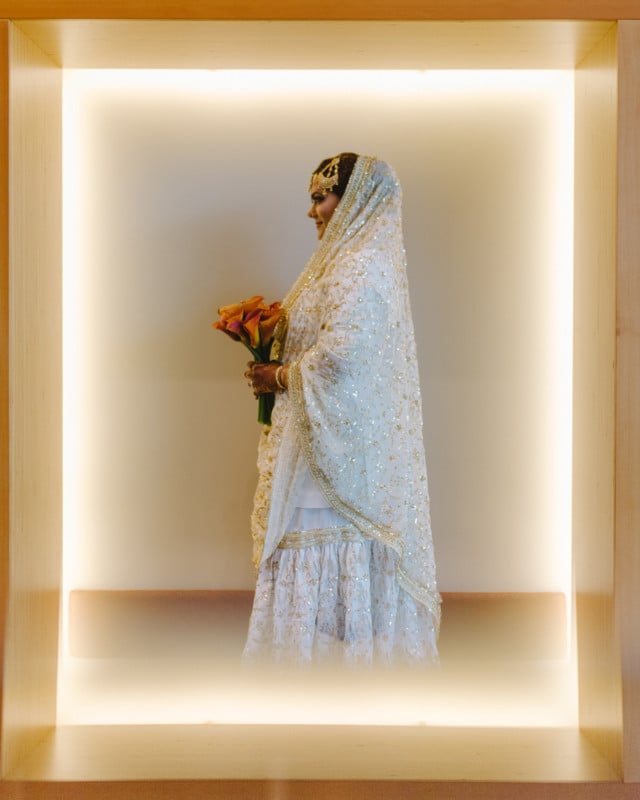
2. The reflected portion of the image will often appear darker or lighter than the rest of the image. Applying a gradient in post-production helps to add balance and intrigue to the image.
BeforeAfter (with gradient applied to lower part of image).
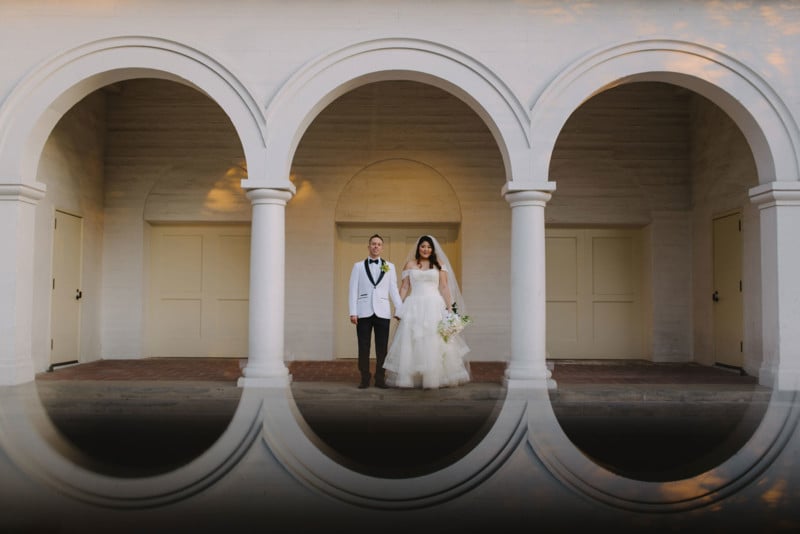
3. Architectural elements (ie. Window, pillars, arches) reflect well and often work great with this technique.
BeforeAfter
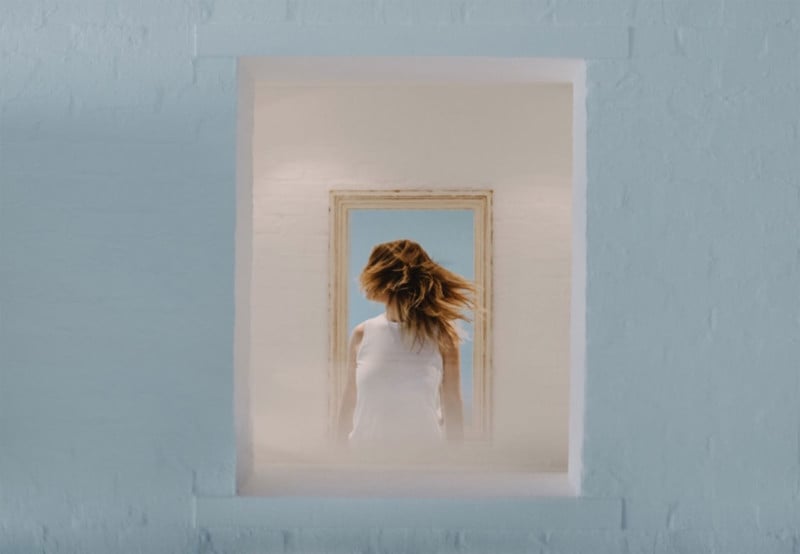
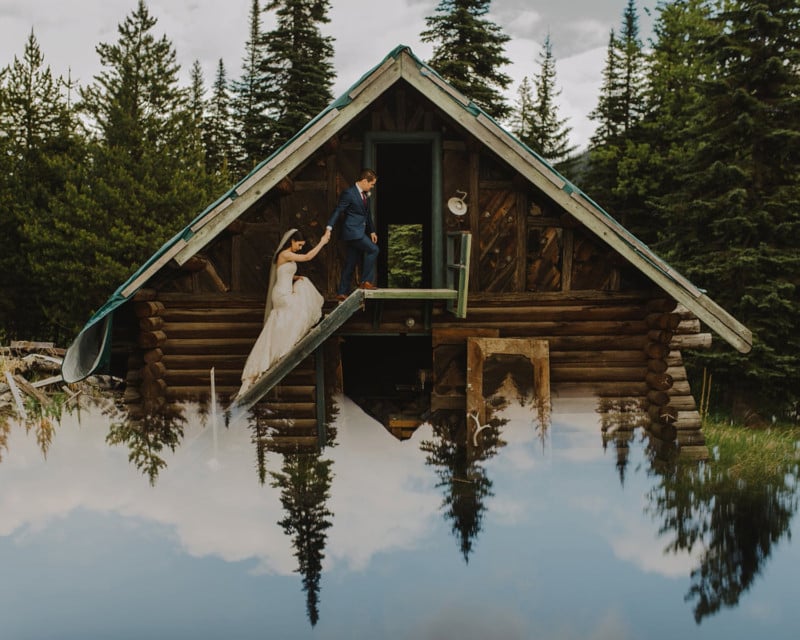
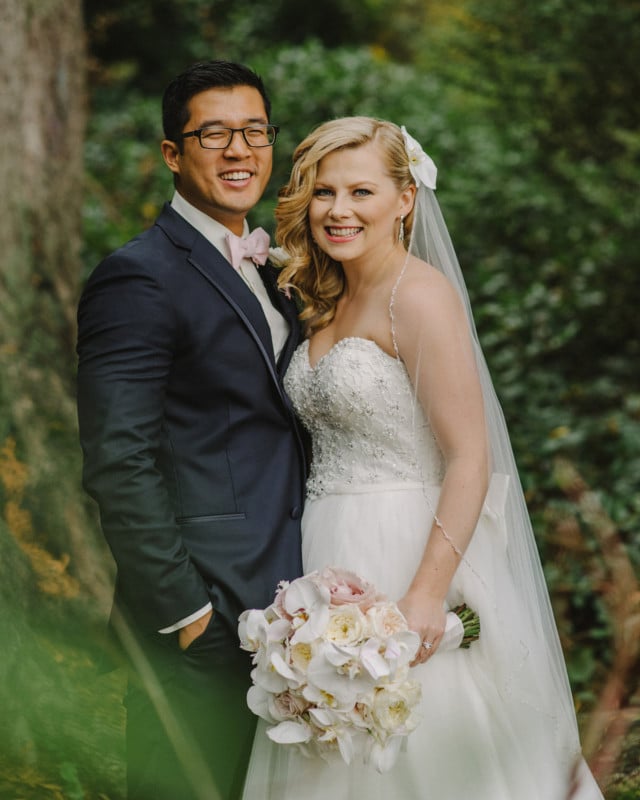
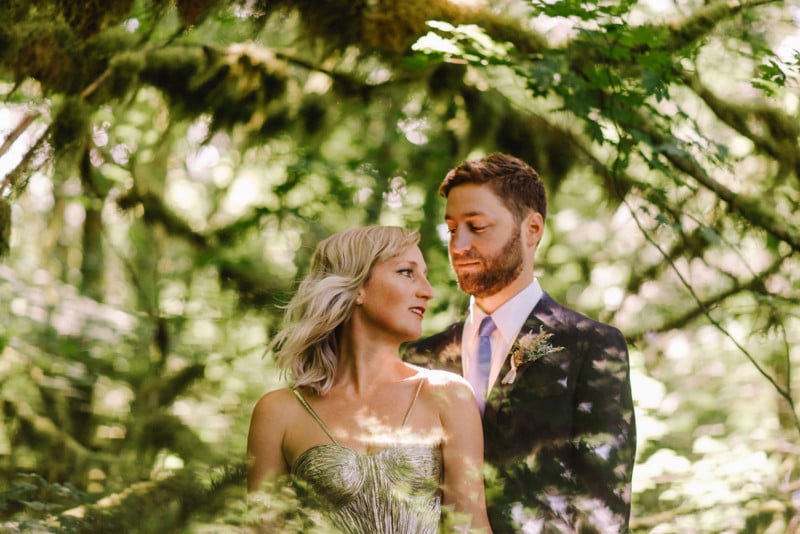
4. Results don’t always have to be dramatic. Sometimes a slight reflection can help frame a subject or add that little something.
About the author: Mathias Fast is a wedding photographer based in Vancouver, Canada, and Cape Town, South Africa. You can find more of his work on his website, Facebook, and Instagram.
original post from :https://petapixel.com/2018/06/07/how-to-use-a-phone-screen-for-magical-portraits/
Sunday 6 August 2017
It’s obvious that Google is interested in mapping just about everything that is mappable via Street View, but even our future overlords they need some help on occasion. Although the company is willing to send employees with trekker backpacks to many an exotic location, when it comes to taking a virtual tour of local businesses, the search giant hires on “trusted photographers.”
One such photographer recently sat down with Tested and told them all about the process of becoming a Google Business Trusted Photographer and taking Street View indoors.
Where Google’s employees have the help of a capable trekker camera backpack that does most of the work automatically, Google trusted photographers must use their own gear. In Jeremy Powlus‘ case, that means attaching an 8mm lens to his Canon 7D (only certain cameras and lenses are allowed), setting it up on his tripod, and getting to work.
Original Post from : https://petapixel.com/2013/08/30/google-business-photographer-talks-shooting-street-view-inside-businesses/
Sunday 2 July 2017
Choosing a tripod can be an overwhelming experience, given how many different types and choices we are presented with. On one hand, a tripod is a very simple tool to keep our cameras steady when we use them in challenging light conditions. On the other hand, there are so many different variables that come into play when choosing a tripod: How tall should it be? How light should it be? How stable should it be? What kind of weight can it support? How much should I spend on a tripod? These are just some of the questions that might come up as you look into buying a new tripod.
Before getting into the intricate details about tripods, I would like to go over the advantages and disadvantages of tripods and why you might need one for your DSLR.
1) Why Do You Need a Tripod?
So, what is the purpose of a tripod? You might need a tripod for some or all of the following reasons:
To rest heavy camera gear such as long telephoto lenses on the tripod.
To increase the quality of the images by keeping the camera ISO low.
To allow more careful composition, while framing the shot exactly how you want it.
To shoot HDR and panoramic shots that require exactly the same framing and precision.
To photograph nighttime objects such as the Moon, planets, stars, etc. as well as painting with light or using available light for landscape and architectural photography.
To do self-portraits with a camera timer.
To shoot extreme close-ups/macro (flowers, insects, etc).
To hold various objects such as flashes, reflectors, etc.
To shoot at difficult or impossible (hand-held) angles.
To shoot vibration-free videos.
To defend yourself :)
I personally use a tripod for one main reason – landscape photography. Shooting sunrises and sunsets can be quite challenging, especially when the light conditions are far from ideal. Thanks to image stabilized lenses and now cameras with excellent built-in image stabilization, the use of a tripod for most types of photography is not necessary when shooting in daylight conditions. However, some photographers still prefer to use a tripod, as it allows them to keep the camera ISO as low as possible, which not only keeps the amount of noise in images to a minimum, but also provides the highest dynamic range the camera sensor can capture. In addition, a tripod can help in proper framing of a subject and allow to capture panoramic and HDR images. Lastly, there are situations where one must use a tripod in order to slow down and blur action, such as when photographing streams and waterfalls as shown in the image below. Therefore, if you are into landscape photography, a good tripod is a must-have tool in the field.
Occasionally, I might use a tripod for wildlife photography (specifically birds), but not during long hikes, due to inconvenience and weight factors.
2) Tripod Components – What is a Tripod System?
A tripod system is generally comprised of the following parts:
Legs – the obvious. Tripod legs are typically made of aluminum, basalt, steel or carbon fiber.
Head – the part that holds a digital camera or a lens. There are many different types of heads, but the most popular types are ball-heads and pan-tilt heads.
Centerpost/Center Column – a separate leg that runs through the middle, allowing to further raise the tripod head.
Feet – good tripods allow changing tripod feet at the end of the legs for indoor and outdoor use.
The cheapest tripods have legs with an integrated non-replaceable head and feet and sometimes have a centerpost, while the top-of-the-line tripods have a modular tripod system that have replaceable feet and allow attaching a separate tripod head (the head is typically not included).
3) Disadvantages of Using a Tripod
Tripods are nice and can give you many options to get the highest quality image. However, there are also some disadvantages of using tripods, specifically:
They are potentially heavy. Although there are lightweight carbon-fiber tripods out there, once you add a tripod head, the setup can become heavy.
They are inconvenient. No matter how small and collapsible a tripod is, it still occupies space and is often inconvenient to carry around or travel with.
They are difficult to use in crowded environments.
They can be expensive. Good tripod systems can cost over $1,000.
They can take time to set up, making you miss the best moment.
You can easily damage your camera and lens if you do not know how to properly operate a tripod, or if the tripod system is cheap and unstable.
4) Factors to Consider When Choosing a Tripod
You started your tripod shopping spree and have no idea where to start. What factors do you need to consider when purchasing a tripod? As I have pointed out above, purchasing a tripod can be an overwhelming experience, given how many different choices we are presented with from small and compact, to large and heavy. Let’s go through each factor and identify your needs:
4.1) Weight Rating
The first thing I would look at is how much weight a tripod can support. Many photographers make the mistake of buying a tripod that can only support a few pounds and is not made for heavy camera equipment. What ends up happening is the obvious – at one point or another the whole thing collapses, destroying the camera and the lens. Always make sure that the tripod you want to buy can support at least 1.5 times more than the total weight of your camera and your heaviest lens. I say at least, because I prefer to keep it at around 2x more. Do not forget that you will at times apply pressure on your camera and sometimes even rest your hands on the setup if you are shooting with long lenses, which adds to the weight. You might also add a flash or a battery grip to your camera in the future, or potentially shoot with something heavier, so you have to keep all of that in mind.
4.2) Tripod Height
I always recommend buying a tripod that matches your height, so that you do not have to bend to look into the viewfinder. Once you put your camera on a tripod, the viewfinder should be at your eye level. It is OK if it goes higher than your eye level, because you can always adjust the legs to be shorter. However, if it is much below your eye level, you will find yourself bending all the time, which can be a tiring experience, especially when you are waiting for some kind of action and need to constantly look through the viewfinder.
If you are buying a tripod with an attached head, you want the tip of the head to be on your jaw level. If you are buying a modular tripod with a separate head, make sure that the legs end approximately on your shoulder level.
Another factor to consider is tripod height when it is folded for easier travel. Do you need it to fit in your carry-on luggage? Mine barely does diagonally, with feet removed, and I take it with me everywhere I go.
4.3) Tripod Weight and Construction
Weight is a significant factor when choosing a tripod. You do not want your tripod to be too heavy, because you will find yourself leaving it at home, rather than taking it with you on the road. The lightest tripods are made of carbon-fiber material, which is extremely durable, stable and does not rust. While carbon-fiber is the best material for a tripod, it unfortunately comes at a high price tag.
The next best construction material is aluminum, which is heavier than carbon fiber. Most cheaper tripods are made of aluminum today. You can also find tripods made of stainless steel, but those are generally used for video equipment and are too heavy for regular use.
In terms of total weight, try to keep the tripod legs without the head under 5 pounds. Generally, carbon fiber legs are between 3 and 4 pounds (but can be lighter or heavier depending on what they are made for), while aluminum legs can be between 5 and 6 pounds and heavier, depending on the size and how much weight they can support. Basalt lava legs are somewhere in-between both in terms of weight and cost.
Tripod legs generally come in two forms – tubular and non-tubular. All carbon-fiber legs come in tubular form and have a threaded twist-lock system to secure the legs, while aluminum, basalt and steel tripods might come in different shapes with a flip-lock. Depending on the maximum height of the tripod, there might be between 3 and 5 sections on tripod legs. The more sections, the higher the tripod and generally a little less stable.
Some advanced tripods will allow you to replace tripod feet for different conditions and situations – they just unscrew on the bottom of the tripod legs. There are different types of tripod feet for indoors (rubber or plastic) and outdoors use (metal spikes). Unless you are planning to shoot in icy, rainy/slippery conditions, the standard rubber feet that come with your tripod should work just fine.
Some tripods come with a centerpost – a single leg in the middle of the tripod that allows you to increase or decrease the height of the camera by simply moving the centerpost in upward or downward direction. Although some photographers find it convenient and nice to have, I strongly advice against having a centerpost on a tripod. A centerpost defeats the whole purpose of a tripod – it is essentially the same thing as having a monopod on top of a tripod. It might not be as pronounced if you are only shooting with a wide-angle lens, but once you set up a long telephoto lens, you will quickly understand that using a centerpost will cause too much vibration. If you still want to get a centerpost for whatever reason, make sure that it can fully decline to the same level as where the tripod legs meet. The centerpost should never wobble at its lowest level.
A tripod head is the most essential part of the tripod system. It is responsible for securely holding camera equipment and controlling camera movement. A modular tripod system does not come with a head and you have to buy it separately. When choosing a tripod head, always make sure that it can support at least the same amount of weight your tripod legs can.
There are three types of heads commonly available:
Pan-Tilt Head – either with a single handle for horizontal movement or dual handles for both horizontal and vertical movement. This is the most common type of head that is typically built into cheaper tripods.
Ball-Head – compared to pan-tilt heads, ball-heads only have one control that loosens or tightens the grip. They are very flexible and allow very smooth operation while keeping the camera/lens securely tightened.
Gimbal Head – a specialized head for long and heavy 300mm+ lenses. Compared to pan-tilt heads and ball-heads, gimbal heads perfectly balance the camera and heavy lens and are best suited for fast-action photography. They are extremely easy to use in any direction and do not require tightening the head every time the camera/lens moves.
I started out with a pan-tilt head and eventually switched over to a ball-head with a quick-release system (see next), due to flexibility and easiness of use.
4.8) Quick-Release System
Every modern camera comes with a thread on its bottom that allows you to attach it to a tripod or a monopod (heavy lenses also come with a similar thread on the tripod collar). This threaded system makes it extremely inconvenient to attach cameras and lenses on tripods, because you have to either rotate the camera or the tripod to attach them together. To make it easier and more convenient for photographers, manufacturers came up with a great solution – to attach a small removable plate on the camera or lens, which then can be tightly secured on the tripod head.
Cheaper tripods come with a simple plastic plate that can be attached on any camera or lens, while some of the more expensive tripod heads come with a more durable plate. The best quick-release system, however, is the Arca-Swiss Quick Release System. It has more or less become a standard among manufacturers and it has proven to be a very effective solution for quick and easy operation. Compared to plastic plates, the Arca-Swiss Quick Release System is made of very strong aluminum and allows attaching the camera/lens on a tripod without the need to rotate anything. A quick-release plate is permanently attached to a camera or lens, which then easily slides into a quick-release clamp (pictured below). The locking mechanism is simple, yet super tight for a vibration-free operation.
The beauty of this system is that some manufacturers like Really Right Stuff and Kirk Enterprises offer not only plates for almost any camera and lens, but also replacement lens tripod collars, flash brackets, L-brackets and other accessories for the Arca-Swiss Quick Release System. The only downside of the Arca-Swiss Quick Release System is that it is not cheap – you also have to purchase separate plates for each camera and lens.
4.9) Stability
A heavy tripod does not always mean that it is stable. There are plenty of tripod systems out there that are heavy and durable, yet lack the much-needed stability when used in various weather conditions. When a tripod is fully set up, it has to withstand not only wind, but also occasional bumps and knocks that might happen in the field. You always need to make sure that your camera and lens balance on a tripod rather than lean towards one direction, because you might end up damaging your equipment if the head is not fully tightened or if the front outweighs the back and everything falls on the ground.
5) Which Tripod Should you Buy?
Now that you are familiar with all the criteria for selecting the right tripod, you are probably wondering which tripod you should buy for your photography needs. Since I have numerously gone through the experience of shopping for tripods and have seen others do the same, let me tell you what many photographers end up doing. They first look for the cheapest tripod available that will be good enough to hold their first camera, since they have no idea if they really need it or do not know how often they would be using it. The tripod would cost between $75 and $150 for the legs and the head, which is a good price for a simple tool. Next, they purchase a longer and heavier lens and add more weight to the setup. All of a sudden, they find that the cheap tripod is not good enough and they need something more durable and stable. After making the first mistake, they suddenly realize that they need to do more research and they spend countless hours reading about tripods on different websites and forums. Despite all recommendations from the pros, they are not willing to invest on a top-of-the-line tripod with a good ball-head, so they end up getting a popular tripod system for $300-500 with a separate head. Seems like a great investment and the tripod seems to be much better than the previous one. After a year or two, they realize that their last purchase was not that good, because the tripod is too heavy and hard to use, especially for traveling. They realize that they should have listened to the pros in the beginning and bought a solid tripod system. Does this sound familiar? It certainly does for me, because I went through a similar experience and wasted too much effort and money.
Other photographers might have a different story, where they purchased an inexpensive tripod they like in the beginning and they are still happily using it today. All it says about them, is that they are not using their tripods as much and what they have is good enough for occasional use. Anybody who heavily relies on a tripod (especially landscape and architectural photographers) ends up buying two to three different tripods to eventually end up with the best.
It seems that it is hard to avoid purchasing multiple tripods, because it is often impossible to justify the cost of a good system to someone who does not heavily use a tripod. If someone told me that I would eventually spend more than $500 on a tripod system when I just got into photography, I would have never believed them – that’s too much money to spend on a darn tripod! But it all turned out to be true, because I actually ended up spending a lot more than $500 overtime, and I wish I could go back in time and buy the right stuff from the very beginning.
If I recommend someone who has just bought their first DSLR or a mirrorless camera to get the best tripod system that costs between $800 and $1,200, I will almost certainly get a “you are crazy” look, no matter how well I explain my story. Therefore, here is what I would recommend:
If you currently do not have a tripod and you want to buy one, get the cheapest aluminum tripod system with an integrated head for less than $150 total. Why do I recommend the cheapest tripod? Because you first need to understand how much you will be using it. Six months down the road you might end up doing other type of photography that does not require a tripod or you might find yourself on a path of becoming a good landscape or macro photographer. A cheap tripod will give you enough information to understand the real role of a tripod in your photography.
If you already have a cheap tripod and you want to get something better, save yourself a lot of money and frustration and get the best tripod with an arca-swiss quick release system – skip the middle. Some people buy cheaper legs and heads and either find them too heavy or unstable. One common problem with other quick-release systems, is the fact that cheaper plates do not grip well on cameras and start wiggling and rotating relative to the base, making it a nightmare for things like panoramic photography.
Original Post from : https://photographylife.com/how-to-choose-and-buy-a-tripod-for-a-dslr-camera
Shop Recommend Camera Tripod :
Manbily - is a Low Price but good quality product , Hot sale in Amazon and Tmall China Market .
Quality can become sirui but the price is OEM Price


.jpeg)